When I was younger, I watched a bunch of home decorating shows. It seemed that crown molding was making a resurgence after decades of not being used. You can see filigreed, elaborate crown molding in many old Victorian-era homes, but it wasn’t common when the homes were built between 1950-1980. I always dreamt that my home would have clean lines of bright white crown molding.
Putting it all together, it seemed an easy enough process. Measure, cut, nail, and paint. However, there always seems to be gaps where the pieces met, or it simply looked unfinished. To solve this, I set out looking for a professional painter’s tip: caulk and spackle.
It’s important to understand when to use caulk and when to use spackle on crown molding so that those gaps do not reappear. Some minor tips should be kept in mind when hiding seams.
Using Spackle to Hide Crown Molding Seams
There are two types of seams in crown molding: seams (above and below) and joints (where the two molding pieces meet). Now, painters may suggest sticking to caulk for filing in the joints, but most construction workers will say that spackle is the best option.
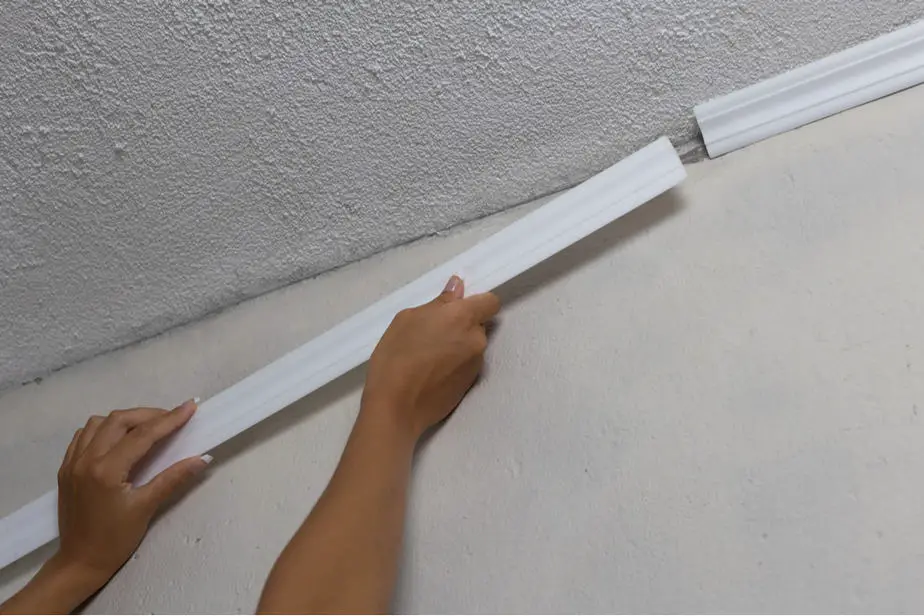
Very few rooms are the right size to not need any additional cuts of crown molding. Those few that are lucky enough still must meet in the corners.

![]()
The trouble with wood is that it swells and contracts with humidity. Swelling is not too much of a problem, but when the wood contracts, you’ll see all the joints in the room. Caulk does not swell or contract with the wood, causing splitting and cracking.
To fix this, use spackle, which is made of gypsum powder and binders. You’ll already want to have the sandable spackle on hand to cover those small nail holes you added when hanging the crown molding. After all, you want it to look smooth and finished, right?
Some spackle is sold in tubes so that it can very easily be laid onto the joints, similar to how the caulk is.
After that, do everything the same way. Put the spackle onto the joints (and nail holes), smooth out with a putty knife (some are made specifically for small spots, like crown molding), and allow it to dry.
Give it about an hour, and gently sand the spackle down. If you are unhappy with the finished product, add another layer, but make sure the first is completely dry.
Some spackle is one color and dries white so that you know when it is completely dry. This is also very helpful for when you are doing an entire room, and cannot keep track of where you started. Once it is dry, simply paint over it as you would the rest of the crown molding. This should be done before you lay the caulk at the gaps.
Using Caulk to Hide Crown Molding Seams
Most painters will recommend that you pull out the caulk when you’re getting ready to install and paint your crown molding. The reasoning for this is that caulk is often used to finish construction projects to avoid disjointed looks and look smoother.
![]()
Caulk is typically made of silicone or latex. This allows it to be flexible as it dries, providing a rubbery finish. These come in tubes, sometimes squeezable, but typically in tubes that require a caulk gun. This is that round, gun-looking thing you probably played with as a kid.
The tube in the gun allows for a bit less control than the squeeze tubes. Typically, the squeeze tubes have smaller openings, so that less caulk comes out at once. However, you’ll want to use the gun to save your hand from cramping on large projects like a whole room.
Use the caulk, which can come tinted to the color you’ve painted your crown molding, for the seams above and below the crown molding. These would be where the molding meets the ceiling (above) and where the molding meets the wall (below).
Run a small bead of caulk along with the molding, allowing the caulk to settle into the gaps. Use a caulk scraper (my professional painter suggested using your finger), to help the caulk settle in the crease and remove excess caulk. This will also provide a smooth finish so that the seams simply disappear.
Tip: Follow these steps to keep your crown molding looking its best:
- Hang molding
- Use spackle to cover nail holes and joints
- Paint molding
- Use caulk to hide upper and lower seams (this will prevent caked-on paint from gunking up your caulk)


