Tongue and groove pine wood fit together using an interlocking technique in which one edge of a pine board resembles a tongue, and the other edge is an opening for the tongue to be held in place, known as a groove. This is a very secure way of fitting wood together to install floors, ceilings, or walls. However, despite how secure this type of wood is, it will still need nails to keep it into place for a much more firm fit.
The way you secure the wood is by using brad nails or finish nails. These nails come in various lengths, and you will have to decide the best nail to use based on the type of installation you are doing. You will also have to determine whether to face nail or blind nail the nail into your pine wood.
To ensure that your tongue and groove pine are correctly installed and secure, you will have to make sure that you choose the job’s proper nails and nail technique. Although tongue and groove installation is very secure, you still want to nail them in place to minimize any movement, especially as the board expands and shrinks over time.
Contents
What is Tongue and Groove?
Many centuries ago in colonial America, dirt floors were the only type of floor that most houses had. Though it was a common type of flooring, it was not ideal for many reasons. For one, the free-flowing dust throughout the air caused all kinds of air quality issues. In addition, the wetness of the soil could also cause mold and mildew issues within the home. Both the bad air quality and the moisture issues presented health problems.
Wood floors were popular in the 1600s but were primarily installed by artisans who used them in public places and homes of the elite. During the colonial period in America, wood floors eventually became popular when timber could start being converted into lumber. These wood planks would be lined up on the floor next to each other and nailed into the floor joist. However, gaps would eventually form between the wood due to fluctuations in the temperature allowing cold air and moisture to get into the house.
In 1885, an invention called the side-matcher would allow the tongue and groove method to be possible. This method permitted boards to fit together perfectly, preventing the issues of spacing that side-by-side planks presented. Over time, this method of interlocking wood, applied to various types of wood, including pine, and eventually expanded beyond the floor to walls and ceilings of homes.
Why Nails Are Important For Tongue and Groove Installations
Tongue and groove created wood floors that were much more uniform and less likely to be unlevel, creating a much better looking and more functional floor. Although this new method of interlocking wood was much better than placing boards next to one another and nailing them, there were still movement and shrinkage issues.
When you install tongue and groove pine, the tongue fits snugly into the groove part of the wood. To make the fit even more secure, you should take a small block of wood and a hammer and gently push the wood into the groove, making sure it locks into place. Nailing your tongue and groove installations provide more security.
When you are nailing the tongue and groove boards into place, you should make sure that you locate the joists beneath the floor, ceiling, or wall. Nailing the tongue and groove boards at the joists provide an even better level of security for the boards. Joists are part of the floor or ceiling frame and help keep the tongue and groove pine securely in place.
Brad Nails v. Finish Nails in Tongue and Groove Pine
It is crucial that you don’t just use any nail and drive it through tongue and groove paneling. Pine is a soft hardwood and tongue and groove is a very delicate system for interlocking pieces of pine wood. Therefore, the wrong type of nail and the wrong type of tool to insert the nail can cause the wood to split or otherwise be damaged somehow.
The two most common types of nails used for tongue and groove paneling projects are the brad nail or the finish nail. Brad nails are made of 18-gauge steel wire and because they are very thin nails, it makes them perfect for use with delicate material such as pine wood. In addition, they are great for tongue and groove paneling because it is easy to mask them in the wood.
Finish nails are made of 15 or 16-gauge steel wire. The higher the gauge, the larger the diameter of a nail. Thus, finish nails are slightly thicker than brad nails. Both brad and finish nails are best used on pine, but finish nails are more useful when installing thicker boards because the larger diameter makes them stronger than brad nails.
Besides the gauge of the nail, another essential thing to keep in mind is the length of the nail. The nail must not only be strong enough to hold the wood but also should be long enough to go through the wood and into the ceiling, floor, or wall below it. Typically, 1 ½ to 2″ nails are suitable for the job.
Face Nail v. Blind Nail for Tongue and Groove
Aside from the thickness of the nail, another critical aspect of using nails to install tongue and groove pine is how you insert the nail into the board. Some people use the face nail technique, while others use the blind nail method. It primarily depends on the type of project you are working on which method you employ.
Face nailing is the most common way to drive a nail through the wood. This technique involves driving the nail perpendicular to the board. It is one of the more traditional methods of inserting nails into boards. When employing this method, the nail head is visible and may be covered up with caulk or putty to keep it from showing.
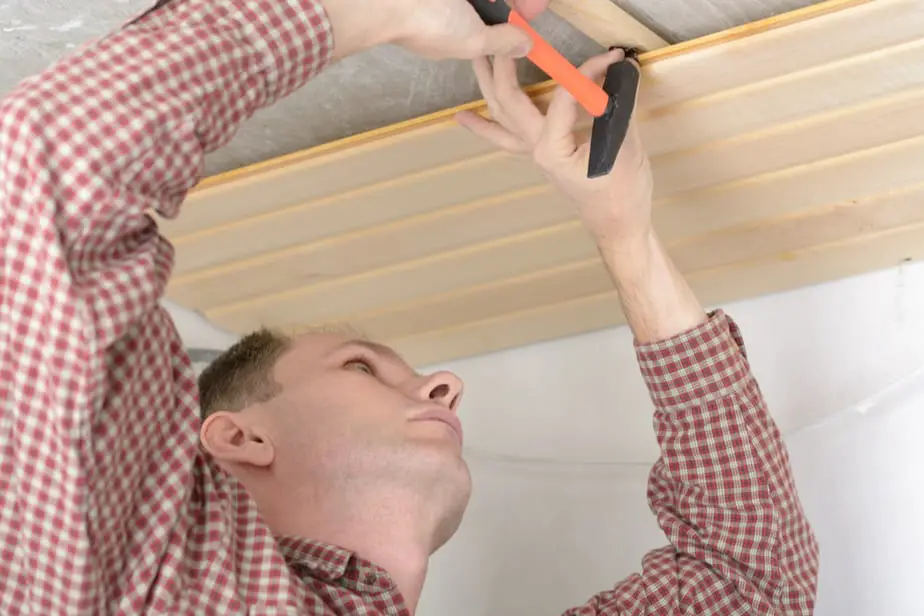
Blind nailing is another method used for tongue and groove paneling. The nail is typically driven into the board at a 45-degree angle at the tongue. This method hides the nails, so there is no need to cover them to hide the nail head.
When installing this nail, you can use a hammer or a nailer to shoot the nail in. Whether you are using a hammer or a nailer, you must be careful not to damage the tongue part of the paneling, which can bend or split.
Things To Keep In Mind When Using a Hammer Or Nailer
When you use a hammer, you can gently hammer the brad or finish nail to a certain point. Then it is a good idea to finish driving the nail using a scrap piece of wood or a nail set. This is because pine is a very soft hardwood, and if you miss the nail and accidentally hit it with a hammer, this can damage the wood by leaving a hammer imprint. The best way to minimize inadvertently hitting the wood with a hammer is to use a scrap piece of wood that surrounds the nail as you are pounding. This will allow you to hit the scrap wood instead of the tongue and groove pine. Another method is to use a nail set. It will enable you to drive the nail in by hitting this tool instead of the nail itself, giving you more room for error.
Although hammering is an excellent tool to use, there are times when a nailer may be more convenient. For instance, using a hammer on a ceiling may cause much strain on your body. A nailer would allow for less body strain as you input nails over your head. The type of tool you use to drive the nail into the ceiling, floor, or wall is entirely up to you.


