A big selling point for many houses is crown molding. Not many houses have crown molding installed even today. But crown molding, especially the ones that have a design on them, is sure to draw eyes and elicit comments whether from friends or potential buyers. But there is one question that comes up a lot when people are trying to install crown molding themselves. What size nails should I use for crown molding?
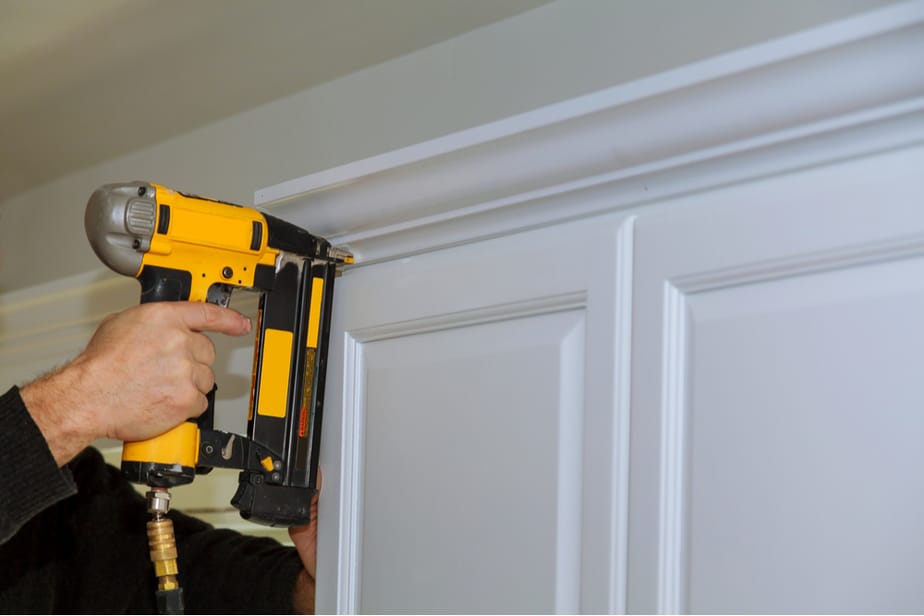
For installing crown molding, you will want to use 2-inch finishing nails. Instead of using a hammer, you will need to use a compressor and a finishing gun. The corners will require a brad nailer with a 1” nail instead. You will use the nails every 16 to 24-inches, depending on where the studs and joists are in your walls and ceilings.
Find out how to find where the studs and joists are, and more, below.
Contents
Why Have Crown Molding?
Crown molding is not installed just for the comments and aesthetic of it. Over time, houses shift and move, which can cause cracks and imperfections to appear on the walls of the home. This is especially true with older homes. But crown molding can hide some of these things. It can also give you more options for your trims. This is because you may want the trim to match with the molding, or at least look more similar, so you have more options that match. Another reason that crown molding is something that you should think about adding to your home is that it can raise the overall price of your home. This is because not many homes have crown molding, although many people love it in their homes. If you are planning on selling your house any time soon, think about installing crown molding.
What Do You Nail Crown Molding to?
Crown molding is nailed to studs and joists in the walls and ceilings. Studs are in the walls of the home while joists are in the ceiling. Once you find the first two studs, it should be easy to find the rest. A stud finder will make the process of finding studs and joists in the house much quicker and easier than doing it by hand. But to find studs and joists without a stud finder, simply knock on your wall. Do it over and over again very close together. A hollow sound means that there is no stud there while a more solid sound means you have found what you are looking for. Also, look for outlets and switches because one side is next to a stud for the wire to run along. Mark where the stud is, then do the knocking once again to find the next one. Once you find that one, mark it, then measure the distance between them. You can mark with a sticker, sticky note, a line with a pencil/marker, whatever will be most visible and easy for you. Most studs are 16-inches apart, though some may be up to 24-inches apart (this is a bit more common in older homes). Towards the corners, you may find studs that are closer together, but this should only be near the corners.
The joists are the other thing that you may nail the crown molding to. Joists are in the ceiling, so although you can do the knocking or tapping to find them, it can feel much harder than it did when doing it on the walls. The angle of your kneck, and moving a stool or ladder around will get annoying fast. But the nice thing to think about is that they are also set 16 to 24-inches apart, depending on the house. You can use a stud finder to find the joists, but the knocking method doesn’t work on plaster. Plaster ceilings are mainly found in older homes but they are very thick so neither of these methods will work. What you will need to do is use a test nail. You can do this with drywall as well, to be sure of the placement of the joist or stud. Using a small nail, measure about 16”. The nail will go through the ceiling easily if the joist is not there. If you don’t find one at 16”, try measuring 24” and look there. You can fill in any holes later using putty or a drywall compound. Check out this blog for more information on plaster ceilings.
The Nails
Now comes the important part, figuring out the nails you should use. 2-inch nails with a finish, installed with a compressor and finishing gun, are recommended for most types of crown molding. The studs are usually 3 ½”, the drywall is ½”, and the most common crown molding is ½”. So a 2-inch nail is perfect. The finishing is important to have on the nails. The finish just means that they are slightly thicker than brad nails, so they have a stronger hold than them. They may leave a residue on your fingers, but it should easily wash off. For the corners, use a 1-inch brad nail with glue. For crown molding that is very thick or if you have plaster ceilings, 16d finish nails are recommended. These nails are 3-3 ½ inches long, and also thicker since they are finished nails. Plaster specifically is much thicker than drywall, so the nail will need to be longer to get through to the studs and joists. You may need to drill a small hole before using these nails however so that you don’t split the wood.
Installing Crown Molding
There are two ways to install crown molding, using a finishing gun, or doing it by hand. Both are fine to do, but going by hand will take much more time. The finishing, a nail gun specifically for finished nails, makes installing the crown molding fast and makes it easy to get the nails straight. The nails can still be straight when going by hand, it just takes more time to be sure the nail is perfect and that you don’t accidentally move it while beginning to hammer. Both processes of installing crown molding can be found below.
Finishing Gun
A finishing gun is definitely the most common way of installing crown molding. It significantly lessens the amount of time the task will take while making the whole process that much easier. It also eliminates most human errors if uses properly. I recommend using any spare pieces of wood that you have laying around to practice using the finishing gun before using it to install the crown molding. This will not only teach you how to use it, but it will also take away any shock you may have from kickback and noise.
- Find the joists and studs using the knocking method or a stud finder. Mark them once you have found them.
- Put the crown molding on the wall, making sure it is flush and perfectly aligned.
- Using the marks to locate the studs, hold the nail gun flat on the crown molding surface. Start in the middle, putting a nail in the top and bottom of the crown molding.
- Fill in any holes made by the nails with wood putty or a drywall compound.
Hammer
Using a hammer is the cheaper way to install crown molding if you don’t already have a finishing gun. Instead of dealing with borrowing or renting one, you can just use what you already have. Using a hammer may cause you more stress than you would expect, however. You will have to worry about your hands shaking, the nail moving slightly because of this, and then being crooked. Installing crown molding by hand will also take more time because hammering all along the wall and ceiling is a process. Look at this blog for more information.
- Find the joists and studs by using the knocking method or a stud finder. Mark them once you have found them.
- Put the crown molding on the wall. Keep in mind that it must be flush with the wall, and perfectly aligned.
- Carefully hammer the nail in. Once close to the crown molding, be careful with your swings so as not to damage the new addition to the house. On the corners, and if using 16d nails, you will need to drill holes first, so the wood doesn’t splinter.
- You will want to fill in any hole with wood putty or a drywall compound.


