I don’t really love doing laundry. It is far from my favorite chore to do around the house. But I can say that I get this amazing feeling as I see the pile of dirty laundry get smaller and smaller. I also love the smell and feel of fresh, clean sheets on my bed and the warm, fuzzy feeling I get when I put on a sweatshirt fresh out of the dryer on a cool night.
This last weekend I was knocking out loads of laundry left and right. I had fresh sheets ready to go on the bed and was just finishing up my last few loads of clothes. I heard the dryer buzzer go off and I was already starting to get that feeling of accomplishment while I was walking to the dryer. That dirty pile was getting smaller, and I was almost done!
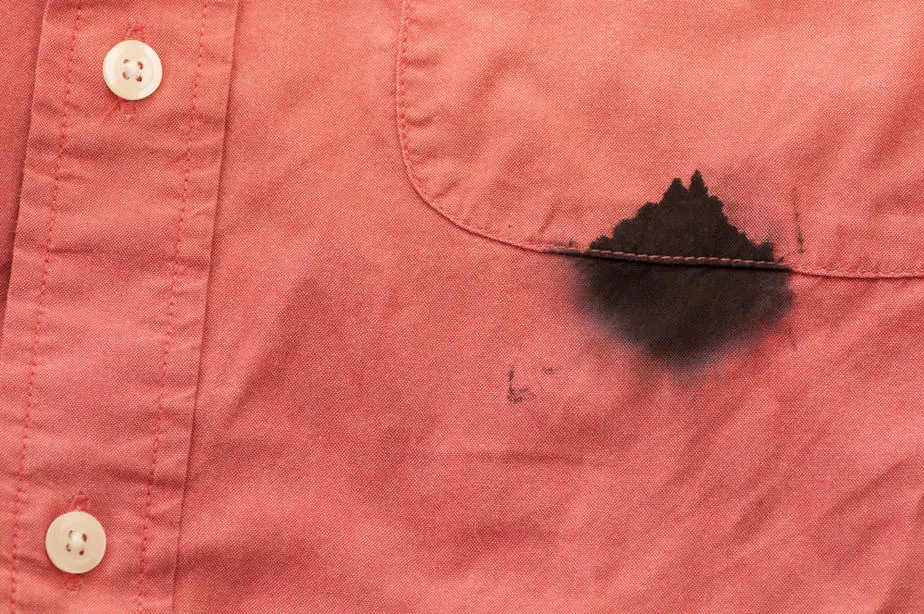
You can imagine my complete horror and disappointment when I started to fold the laundry and saw little blue marks all over my clothes! I looked in the dryer and my nice, white dryer drum was also covered in blue smeared marks. I had no idea what these marks were from until I felt a sharp object coming from one of the pant pockets. I reached in and grabbed out a blue pen. Needless to say, this ruined my great feeling of accomplishment I was starting to get only moments earlier.
I knew that I needed to do something fast. First, I called my mother, then a couple friends, and finally I checked with the rest of the world on Google. After a few panicked moments, I came up with a good plan. Over the next few hours, I worked hard and was able to get my dryer drum all cleaned up and was also able to salvage a good amount of the laundry in that load. I also learned a valuable lesson to always check pockets in anything going into my dryer from that day on.
Here is what I learned and the steps I took to clean up my mess:
Contents
Wait to do more laundry- clean it right away!
I know this would seem like an obvious one, but it is worth noting. When I first saw the pen in the dryer, I instantly got a washcloth and tried wiping it off. It didn’t budge much, and I knew it would need more than that to clean it up. I have to admit, part of me just wondered if I should continue my laundry and deal with it later. If the ink wasn’t coming off, it wouldn’t hurt my next load of laundry, right? Wrong!
As much as I wanted to get my laundry done, it was going to have to wait. The ink may be stubborn and hard to work with when it is dry but as soon as you start up that next load, the ink will heat up and start to ruin your clothes again. That is why it is important to clean it up right away. The longer it is there, the harder it will be to clean. So, I made the hard decision to set my laundry aside and take care of this issue right away.
Turn the dryer on- empty
I know, I just told you not to do any more laundry. So why should you turn your dryer on? As I mentioned before, you do not want to start your laundry back up because the heat will cause the pen to run again and ruin your clothing. However, the heat of the dryer can be used in your favor to help you clean this mess up. You just have to make sure that the dryer is empty. Then turn it on and let it run for at least 15 to 20 minutes on high heat to give it a good amount of time to warm up. While it is running, use your extra time to get your cleaning supplies ready.
Once it is warmed up, turn it off and unplug it. Safety always comes first! Then open it up and begin cleaning it with one of the below suggestions. Remember, the drum will be pretty hot so be careful not to burn yourself while cleaning it.
What Cleaning Solutions to Use
There are several different cleaning options you have for this project. Depending on how bad the ink stains are and how quickly you can get to them, you may need only one of these options or you may need to try them all. If one doesn’t work, don’t get discouraged. Just try another option and see if that one works better.
Make sure you have lots of clean rags or towels ready. If you do not have any handy, you can always find an old shirt and rip it into pieces. Ink really tends to spread easy so as you are cleaning and you fill up a towel or rag, you will want to throw it to the side and start using another one.
Soap and water
You should always start with soap and water. It most likely will not take your stains away but it is a good starting point. It is also a good way to make sure the areas you are going to be working with are free from any other dirt or grime. Mix a few drops of dish soap in a bucket of warm water and use some elbow grease. Scrub away at all the ink spots both in the dryer drum and along side any other areas including gaskets and the door. Don’t be alarmed if you see that the ink is spreading as you clean it. This is very common and might make you worry a bit because you will feel like you are making the problem worse instead of better. Just know that this is an inevitable part of the process, and it will get better.
Magic Eraser
Have you ever used a Magic Eraser? If not, you need to! I always keep a couple of boxes of these on hand in my house. They remove just about anything and everything, they are definitely “magic” as their name states. This was the cleaner that worked best in my dryer and removed almost every spot there was.
As with any cleaner, test it out on a small spot of your dryer drum to make sure it won’t damage the drum at all. Being as most dryer drums are metal, this should not be an issue for most people.
To use the Magic Eraser all you need is a bucket of plain warm water and the eraser sponge. We the sponge and wring it out almost all of the way, leaving just a bit of water on it. Then, just scrub the area using as much pressure as needed to remove the spots. You will notice the ink transferring over to the sponge as you clean so occasionally you will need to rinse out the sponge and start again.
It is a good idea to note that these sponges will disintegrate as you use them, so it is a good idea to rotate the sponge as you use it. When you notice that it is getting too small to easily use or it just isn’t cleaning as well, then it is time to throw out the sponge and get a new one.
Goo-Gone
Goo-Gone is also a great option to remove ink and is super easy to work with. To use it, take a rag and apply a small amount to it. Then, simply wipe down the ink spot using pressure when needed.
After using this product, you will want to wipe down the inside of your dryer. Take a clean washcloth or rag and wet it with warm water and a few drops of dish soap. Then simply wipe down the dryer drum to remove any of the remaining Goo-Gone.
Bleach and water
If using the Magic Eraser and Goo-Gone don’t end up working for you, there is always bleach. This is personally my last option because of the mess it can make, however it is a good option that will get the job done. Be careful when using bleach that you don’t spill any or drip any because it will bleach it’s surroundings super-fast.
There are two ways to use the bleach in your dryer. The first way is to make a mixture of bleach and water in a bucket. A good solution to use is 2 tablespoons of bleach to a gallon of water. The take a clean washcloth or rag and wipe down or scrub the areas you are cleaning. For the really stubborn stains, sometimes it works well to allow the wet washcloth to sit on top of the area for a couple minutes before you begin your scrubbing.
If you don’t want to scrub the areas, there is another way to use bleach in your dryer. This way works best with fresh stains, not the ones that have been through the dryer on a few cycles since their spill. Get a bucket and make a solution of bleach using 2 to 3 tablespoons of bleach per gallon of water. Find a couple of old towels and soak them in the solution. Then wring them out almost all the way, leaving them still wet but not dripping. Place them in the dryer and run it on high heat for about 30 minutes. When you take the towels out, the stains should be gone. Just be sure to throw these towels out.
Whichever of these options you use, make sure you thoroughly clean your dryer after using bleach in it. The last thing you want it to have bleach spots all over your clean laundry! Use some dish soap and water and wipe out the dryer several times to make sure you get all the bleach out. Don’t forget the door, gaskets, and any other hidden places you may not think of.
What NOT to use in your dryer
While I was doing research, I did find several other options for cleaning the dryer. However, many of these options are flammable. It is very important for me to mention that you should not be using flammable cleaners in your dryer. This is a big safety issue! Please make sure that you are double checking the ingredients and making sure the products you use are safe to use. Remember, your dryer can get as hot as 125° to 135° inside and using a flammable cleaner is a fire hazard!
Some of the products you might see suggested that you should NOT use include nail polish remover, rubbing alcohol, and WD-40. While these are great products to get stubborn stains out in other areas, they are not safe products to use for this project.
How to get ink out of your clothing
Now that you have your dryer drum clean and ready to keep knocking out loads of clean laundry, you might be eyeing up that pile of laundry that had the ink in it. For some reason, this was the worse part for me because it was a good range of clothes from everyone in my family and I just figured I would have to throw them all out. However, once I again I took to my friends on Google and found some great ways to salvage most of the pieces.
Go through the laundry carefully
You would think this would be a given but for me it wasn’t. I just had figured it was all ruined, but I was wrong. I went through the entire load of laundry that had been in the dryer and to my excitement, only a little less than half of the load had ink marks on them. In fact, some were so small that you could barely see them. So my first advice would be to go through and figure out how many pieces you need to work on and set them aside. Then, follow the below advice to clean them up.
Use rubbing alcohol
Even though you do not want to use rubbing alcohol on the inside of your dryer drum, it is great to use on the ink stains on your clothing. Before you go full in, make sure you test a spot using a small amount of rubbing alcohol on a Q-tip. Place it on a small area of the clothing and make sure it doesn’t discolor or ruin it.
Next, take either a paper towel or napkin and put it under the article of clothing you are working on. Then soak the ink spot with rubbing alcohol and gently rub it into the stain. Let this sit for roughly 10 to 15 minutes. When it is done soaking, blot it until the ink stain it gone. For more stubborn stains, allow it to soak longer.
As the last step, rinse it well in cold water and treat the area with a stain remover. Then proceed to wash it as normal in the washer. Before throwing it in the dryer, double check to make sure the ink stain is gone. If it is not, repeat the steps as needed.
Do NOT put them in the dryer
While the stain is still on the clothing, do not run it through your dryer yet. The heat of the dryer will set the stain in, and you will have a much less chance of getting it out. I can sadly say that I have learned this the hard way! It is alright if the clothing air dries, you just want to make sure to keep them out of the dryer until the stains can be treated.
Know when to be done
As hard as it is to admit, I do have to note that there is a chance that not every piece of clothing will be able to be saved. Ink stains can be very difficult to get out, especially from clothing. Be prepared to possibly say goodbye to some of the pieces from load. Some blends of fabric are either to fragile to use alcohol on or the ink has set it too much to be removed.


